Taco Shop
| Scaffold Details | |
|---|---|
| Complexity | Beginner |
| Automated Tests | Yes |
| Installed Plugins | LIGO, Taquito, Flextesa, Jest |
| Frontend Dapp | Yes |
| Wallet Integration | Yes |
| Repository | https://github.com/tezostaqueria/taqueria-scaffold-taco-shop |
Quickstart
In a rush? You can follow the steps below to get up and running immediately:
Scaffold and Initialize the Project
taq scaffold https://github.com/tezostaqueria/taqueria-scaffold-taco-shop taco-shopcd taco-shopnpm run setupnpm run start:app
Overview
This scaffold implements a simple full stack Tezos project. It has a React dApp that interacts with a smart contract using Taquito. The contract stores the number of available_tacos and provides a function to buy tacos
The React dApp uses Beacon Wallet to interact with Tezos wallets in the browser and once connected, will display the number of available_tacos stored on-chain in the smart contract. There is also a basic interface which allows the user to buy tacos by sending a transaction to the smart contract with the number_of_tacos_to_buy as a parameter
The smart contract has been deployed to ghostnet at the address for demonstration purposes: KT1KBBk3PXkKmGZn3K6FkktqyPRpEbzJoEPE
The project comes pre-configured with the following:
- Plugins: LIGO, Flextesa, Taquito, Jest
- A LIGO multi-file smart contract:
hello-tacos.mligo,_buy.mligo,_make.mligo,_schema.mligo - A network configuration for the Ghostnet testnet
- An environment named
ghostnetwith faucet to fund operations on the testnet - Native Taqueria testing (Taqueria Jest plugin)
Coming soon
- Passing the deployed contract address to the React dApp via the State API
- Deploying the contract using Taqueria operations
- Targeting a specific network for contract deployment and testing (sandboxes and testnets)
- Deploying the contract to mainnet
Requirements
- Taqueria v0.26.0 or later
- Docker v20.10.12 or later
- Node.js v18.18 or later.
- Temple Wallet (can be found here)
Using the Project
The intended workflow for this project is as follows:
- Compile the LIGO multi-file source code
- Originate the smart contract to the testnet
- Insert the returned contract address into the React dApp
- Build and start the React dApp
- Connect to Temple wallet
- Buy tacos!
Project Overview
Scaffold the Project
This project is available as a Taqueria scaffold. To create a new project from this scaffold, run the following command:
taq scaffold https://github.com/tezostaqueria/taqueria-scaffold-taco-shop taco-shop
This will clone the Taco Shop scaffold project into a directory called taco-shop
Project Setup
To work on the project you need to get into the project directory:
cd taco-shop
Project Structure
.taq- This hidden folder stores the Taqueria configuration and stateapp- This is the React dAppcontracts- This folder contains the multiple file LIGO smart contracttests- This folder contains the automated testsartifacts- This folder contains the compiled Michelson.tzcontracts
Smart Contract
The smart contract hello-tacos.mligo is simple and straightforward. It stores the number of available_tacos in the contract storage, and provides an entrypoint that accepts a tacos_to_buy parameter which will decrease the number of available_tacos by the number of tacos_to_buy
hello-tacos.mligofile itself:
#include "_buy.mligo"
#include "_make.mligo"

let main ((action, store) : (parameter * storage)) =
    match action with
    | Buy qty -> buy(qty, store)
    | Make qty -> make(qty, store)
_buy.mligo
#include "_schema.mligo"

let buy ((tacos_to_buy, store) : (taco_quantity * storage)) =
    if tacos_to_buy > store.available_tacos
    then (failwith "NOT_ENOUGH_TACOS": operation list * storage)
    else (([], {store with available_tacos = abs(store.available_tacos - tacos_to_buy)}) :
        operation list * storage)
_make.mligo
#include "_schema.mligo"

let make ((tacos_to_make, store) : (taco_quantity * storage)) =
    if not (Tezos.get_sender () = store.admin)
    then (failwith "NOT_ALLOWED": operation list * storage)
    else (([], {store with available_tacos = store.available_tacos + tacos_to_make}) :
        (operation list * storage))
_schema.mligo
type taco_quantity = nat
type admin = address

type storage = {
    available_tacos: taco_quantity;
    admin: admin
}

type parameter =
| Buy of taco_quantity
| Make of taco_quantity
hello-tacos.storageList.mligo
#include "hello-tacos.mligo"
// All storage values must be in this file

// Define a storage variable
let storage: storage = {
    available_tacos = 42n;
    admin = ("tz1ge3zb6kC5iUZcXsjxiwwtU5MwP37T6m1z" : address)
}
Compile the Contract
taq compile hello-tacos.mligo
This will compile multi-file contract hello-tacos.mligo to a file, artifacts/hello-tacos.tz
Originate to the Testnet
Run the following command to originate the contract to the ghostnet environment:
taq originate hello-tacos.tz -e testing
This should return the address of the contract on the testnet which looks like this:
┌────────────────┬──────────────────────────────────────┬────────────────┐────────────────┐
│ Contract       │ Address                              │ Alias          │ Destination    │
├────────────────┼──────────────────────────────────────┼────────────────┤────────────────┤
│ hello-tacos.tz │ KT1KBBk3PXkKmGZn3K6FkktqyPRpEbzJoEPE │ hello-tacos    │ ghostnet       │
└────────────────┴──────────────────────────────────────┴────────────────┘────────────────┘
React Dapp
The React dApp retrieves the number of available tacos from the smart contract and displays the value. It provides an interface for the user to buy tacos and looks like this:
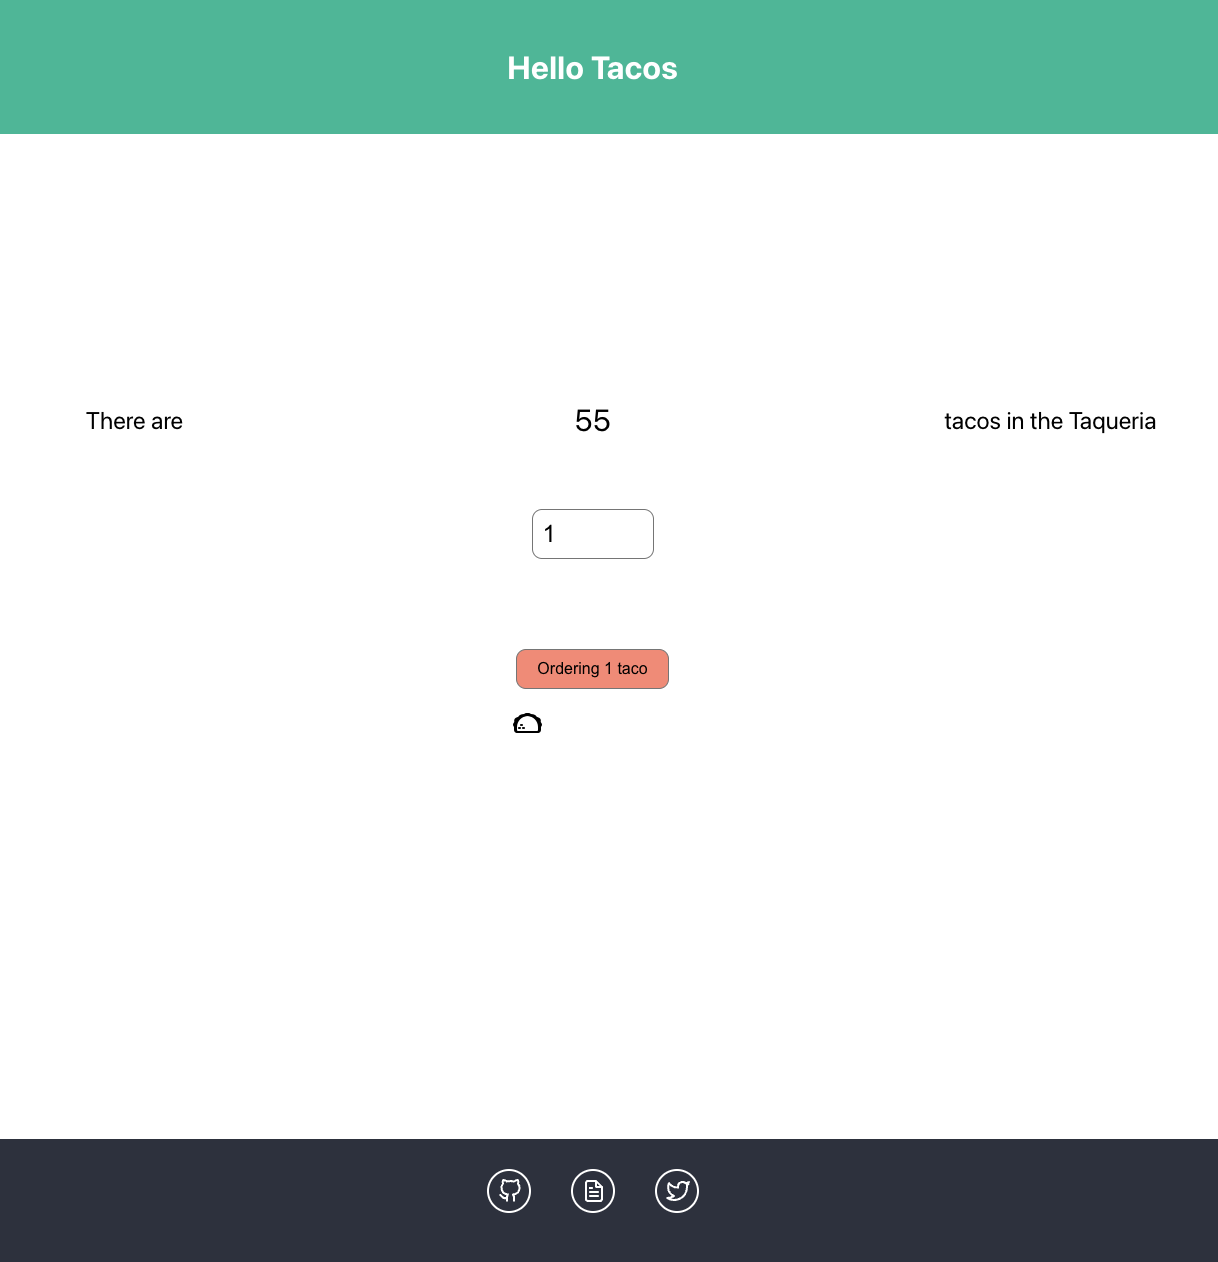
In order for the React dApp to connect to the smart contract, the contract must be deployed to the testnet and the returned address of the contract must be added to the /app/index.tsx file. The scaffold comes pre-configured with the address of the deployed contract for demonstration purposes but it is recommended that you add your own faucet file, then re-deploy the contract and update the references to it in the project for your own use
This will be fixed in the future when contract addresses will be passed via the State API dynamically
Insert the Contract Address
There is a way to point the dApp to a hardcoded contract.
To do so you need to insert the address of the contract into the /app/src/App.tsx file. Copy the address returned from the command above and paste it into the contractAddress variable in the /app/src/App.tsx file as shown here, replacing getAliasAddress(config, "hello-tacos") with the contract address:
function App() {

  // Retrieve the most recent address of the deployed contract

  const [rpcUrl] = useState("https://ghostnet.ecadinfra.com");
  const [contractAddress] = useState(
    "KT1KBBk3PXkKmGZn3K6FkktqyPRpEbzJoEPE"
  );
  const [contractStorage, setContractStorage] = useState<Storage | undefined>(
    undefined
  );
  const [Tezos] = useState<TezosToolkit>(new TezosToolkit(rpcUrl));
  const [connected, setConnected] = useState(false);
Build and Start the React Dapp
Now that the contract has been deployed and the address added to the dApp, you can build and start the React dApp
Change into the /app directory:
cd app
Build the React dApp:
npm run build
Start and serve the dApp:
npm run start
You should now be able to access the Taco Shop dApp at http://localhost:3000
Hot Reload Contract Address
By default, page refresh updates the page UI to point to the address of the new deployment.
Connect to Temple Wallet
Open a browser and navigate to http://localhost:3000
You should see the number of available_tacos displayed
Click on the Connect wallet button in the top right corner of the page and select Temple Wallet
Provide your credentials for the wallet, select a funded account, and click connect
Buy Tacos using the dApp
With your wallet connected, you can now interact with the contract entrypoint
Click the order button and then authorize the transaction in Temple Wallet
Once completed, you will see the value of available_tacos decrease by the number of tacos you ordered
Testing
This scaffold comes with Jest tests in the tests folder which has been initialized as a partition. The scaffold uses the @taqueria/plugin-jest plugin to run the tests
To run the tests, first make sure you have started a local sandbox by running:
taq start sandbox local
Then, run the Jest tests in the tests directory with the following command:
taq test